
Tuesday, June 22, 2010
sgtkokes on Ebay has custom cut a pair of USMC EGA's for the sides of the trailer. When I get them in the mail and applied on the trailer I will post pictures. They are in chrome and I am sure they will fit the theme perfectly.
 I have purchased from this Marine before and his work is incredible. I can not wait to see what they look like.
sgtkokes on Ebay has custom cut a pair of USMC EGA's for the sides of the trailer. When I get them in the mail and applied on the trailer I will post pictures. They are in chrome and I am sure they will fit the theme perfectly.
I have purchased from this Marine before and his work is incredible. I can not wait to see what they look like.
Thursday, June 17, 2010


Maiden Voyage
We went for a short trip to see if all the systems functioned. I am happy to report that all systems worked as planned. The A/C unit is sized correctly to be able to turn the trailer into a rolling meat locker if needed.
The water heater is great, it has enough capacity to take 2 showers without a problem.
The ac and dc electrical systems worked as hoped, and the charger/inverter is fine and keeps up with any drain on the batteries.
The 3000 pure sinewave inverter is fantastic. It operated every load needed and I an not sure but I wonder if it will work the A/C unit in a pinch.

 We are back home now and I an installing a few more cabinets and fine tuning the storage areas, now we know what we need and where it should be located.
The water heater is great, it has enough capacity to take 2 showers without a problem.
The ac and dc electrical systems worked as hoped, and the charger/inverter is fine and keeps up with any drain on the batteries.
The 3000 pure sinewave inverter is fantastic. It operated every load needed and I an not sure but I wonder if it will work the A/C unit in a pinch.


Saturday, June 5, 2010
Initial Test trip
We head out for Americade for a few days. This will allow us to put this through its paces and see what needs changing.
I will post how the systems worked or didn't.
I will post how the systems worked or didn't.
Sunday, May 9, 2010
Fake Wood floor


Took a little while and got the tile down on the galley floor. I have not had a lot of time to work on the hauler but will be changing that very soon. We have a few issues to correct before Americade in a few weeks.
Friday, April 2, 2010
First time for the Harley

Puts the space in perspective. The bike is bigger inside there than it looks on paper.
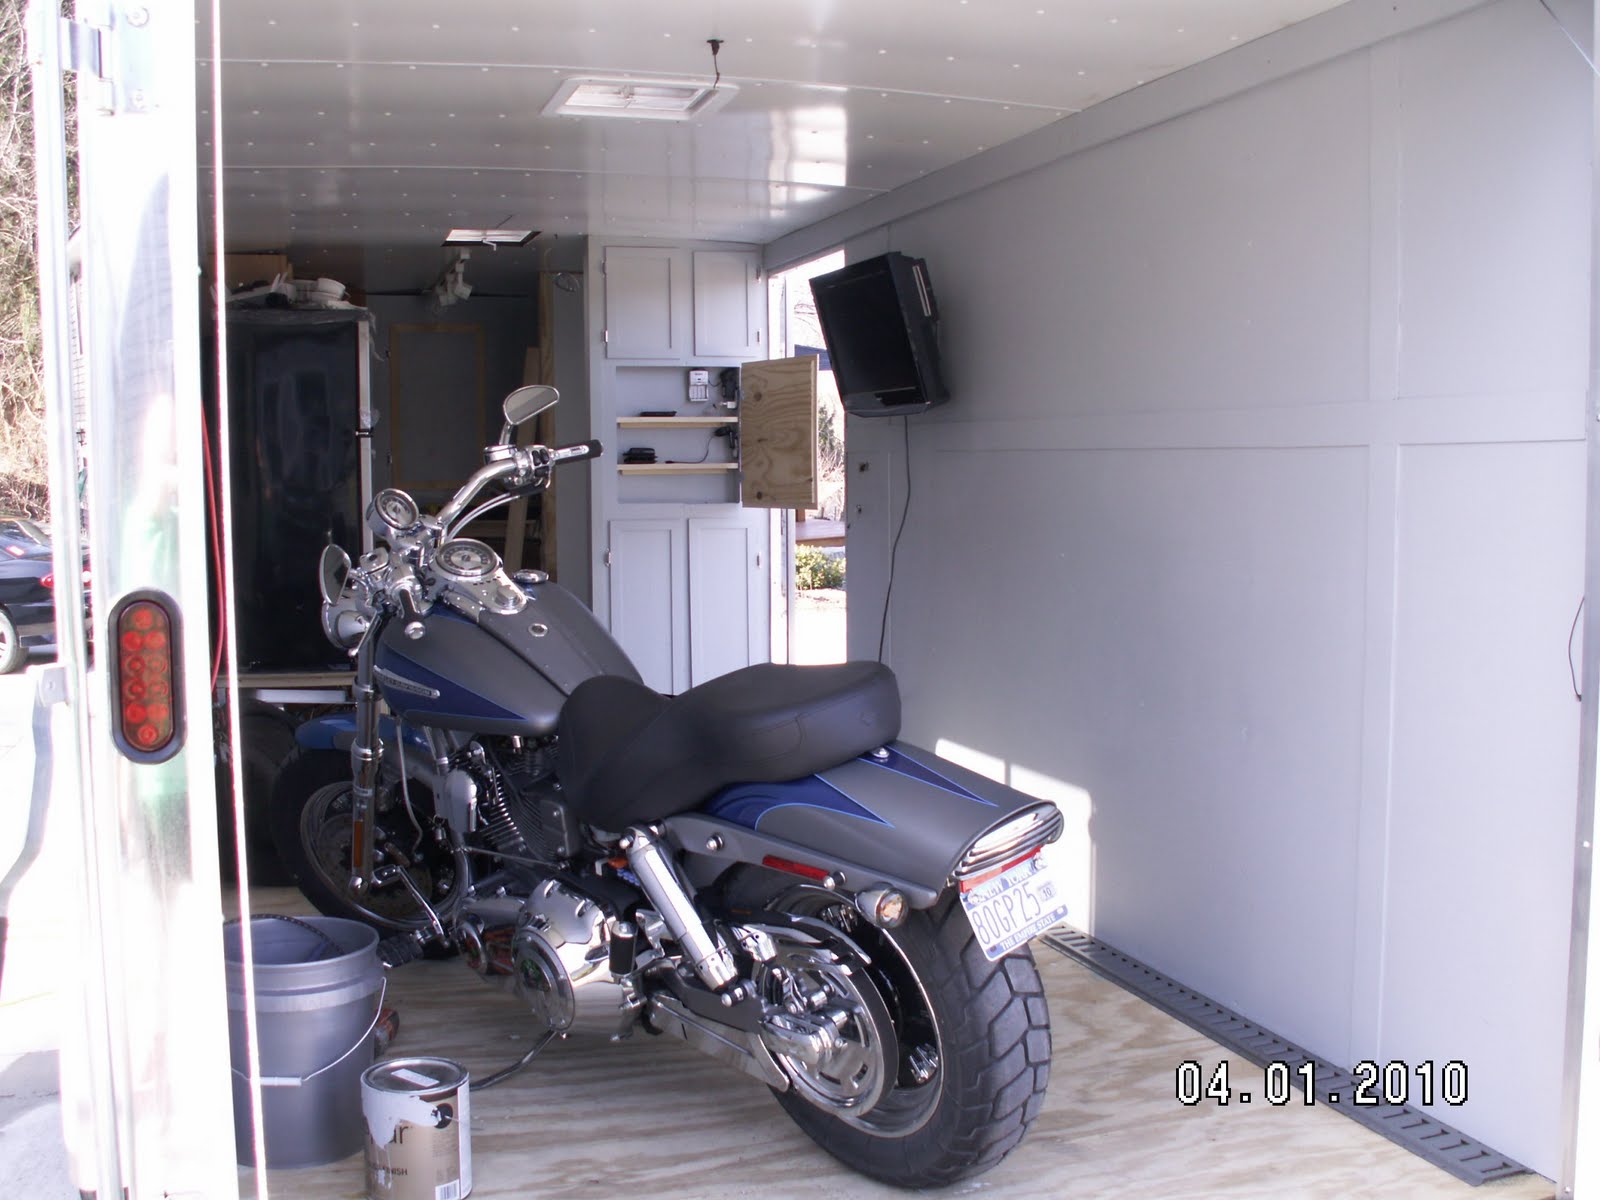

Tina and I will figure the bed placement out and then I can get to building the frame.
Tuesday, March 30, 2010
ADS FROM GOOGLE AND EVERYONE ELSE
PLEASE DON'T HOLD THE ADDS AGAINST US. WE DO NOT GENERATE THE ADDS AND CAN NOT GET RID OF THEM.
GOOGLE PUTS THEM ON THERE WITHOUT ANY CONTROL FROM US.
GOOGLE PUTS THEM ON THERE WITHOUT ANY CONTROL FROM US.
Saturday, March 27, 2010
Ramp door NON-skid surface
Today I wanted to get the ramp done so it had a week to dry before I drive the bike on it. I painted the surface with Rustoleum dark grey paint. I used this because I needed a paint that would give me time to get the surface covered before it dried and would allow me time to spead the grit into it.
I put the paint down THICK with a 1/2 nap roller then I spread Black Majic coarse sandblasting sand over the entire surface. The sand is coarse and should make a good surface that is safe and slip free. It sat for about 6 hours horizonataly so it could get a good set to it before I closed it up for the night because temps are starting to freeze again here. I will run the heat overnight inside the hauler to help the paint cure, but I still will not walk on the surface for atleast a week.
This what the surface looks like so far.


Cutting out cabinets in walls.


Sunday, March 21, 2010
Instant HOT water tank install
I finally ot to the placement of the tank and the plumbing. I am trying to keep the wieght balanced as I build the trailer. So the tank ended going opposite of the batteries, not an even trade, but it works for me.


The plug above is on a dedicated 20 amp breaker for the water heater only.

Tiling the counter top and installing the Sink and Cook top
We decided to try putting self stick tiles over the plywood counter top to make it a little more finished and to protect it from the water and food.
I had NO frigging clue what I was doing so just jumped in to see if I could screw it up. I have never been good a puzzles and finishing the small pieces with what I had left from the big cuts was a challenge.
I started with a strip down the center and worked my way outboard from there.
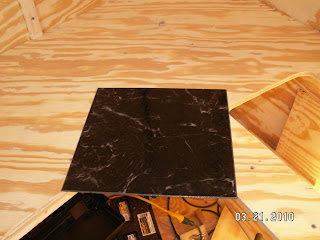 I forgot to tell you that the tile company recomended using a prep solution on the raw plywood to aid in the adhesion of the tiles. So I put the 2 coats recommended the day before so it would have time to dry before I started.


I had NO frigging clue what I was doing so just jumped in to see if I could screw it up. I have never been good a puzzles and finishing the small pieces with what I had left from the big cuts was a challenge.
I started with a strip down the center and worked my way outboard from there.


I have to admit it looks pretty nice, and it should protect it.
Xantrex Pure Sinewave inverter and Battery system start
I purchased the Pure Sinewave inverter so there will not be any issues with the refridgerator or any electronics we will be using.
 I chose the 3000 watt surge / 2000 watt constant inverter. I also purchased the optional remote starter for the inverter to make turning it off and on easier on me.
I will be wiring the inverter to 2 series 29 deep cell batteries.
 This setup should let the fridge run for 20 hours without having to charge the batteries. The batteries will be charged while we are on shore power by the charger inverter, and I will have the batteries charging from the truck while traveling also.
I know that the electrical setup with a 1000/2000 watt inverter will run a 37 in LCD TV and a Bluray player for 6 hours and hardly drain the batteries.

I will be wiring the inverter to 2 series 29 deep cell batteries.

I know that the electrical setup with a 1000/2000 watt inverter will run a 37 in LCD TV and a Bluray player for 6 hours and hardly drain the batteries.
Finishing off the Ceiling.
Finally got the last of the fiber board ceiling up yesterday. The board has a white smooth finish on one side and was rated for damp applications. I thought it would be better to use something rated for a damp environment because of the use the trailer will get. With the 15,000 BTU Air condition unit in it, the inside could get a little damp.
After getting the sheets to line up in the moulding that joins them I drilled 1/4 holes every 6 inches and installed hammer-in large head rivits designed for these sheets. I was afraid that with the bouncing and hard traveling we will be doing that I should keep the rivits close. The last thing I want is for the ceiling to come down on the bike while traveling.
I have an onboard wireless video camera that will have a live shot coming from the trailer to the Toughbook in the truck. That way we can check the status of things in the back without having to stop.


Wednesday, March 10, 2010
Insulating the Ramp door


I was not going to insulate the ramp door. But I had MANY pieces of foam insulation left over, ALL over. I removed the 3/4 in plywood from the ramp and found that the space was about 1 7/8 inches deep. I was going to double the 1 in foam but thought it may make the outside skin bow so left it at 1 layer. I took all the pieces I had an layed them into the voids. After I had most of the surface covered I used a can of Great Stuff to fill in the gaps, this also helps hold the whole thing in place. The Great Stuff expanded enough to hold all the pieces and basically transform them into one piece sheet in the cavities. This recycled basically a whole sheet of foam board that would of ended up in the garbage, and that puts $20.00 back into the trailer fund.
Today I will get the high spots trimmed down and reinstall the plywood.
Monday, March 8, 2010
Communications & Charging center

This wall space will be a Comm Center. There are 2 "clean" plugs for the chargers. Cellphones, video camera, still camera,
The small area below is 16 X 40 X 3 1/2 inches and could be used as lockable storage for small items.
The two areas left hollow by the framing will also be used as storage space.
24 X 40 Bath tub

The bath tub is going in this position. There will be walls all the way around the tub. In the tub will be a toilet mounted so this whole thing will become the "bathroom"

The outside of the walls will be covered in a white surround. Hopefully making the whole room water proof.

Under the forward edge of the bathtub will become a hidden gun closet. There is more room under there than I realized.
Have gotten a little further with the tub area. I installed the surrounding walls and the faucet diverter.

The drain is also in and the undertrailer plumbing has been started.
Ceiling Insulation
Went through and sealed and filled the roof bows with low expansion foam. Then I cut the 1 inch foam for each space, I tried to fit it tightly so it would stay up without glue. After the sheets were pressed between the bows any that seemed to be loose I filled the gaps with caulking.


 Then in the opposite direction I installed the radiant barrier insulation. This is a semi-rigid foil sided 1/2 inch insulation. The sales hype says that this is a R-21 factor insulation, if you can believe that. I am not sure I buy into that, BUT I have used this in my home as a barrier for the radiant heat system, and it does hold back the heat. So if I believe all the BULLS,,T about the R-factors the ceiling will be around R-27, I don't believe it will be that much but I think it will allow us to be cooler inside the trailer.


Thursday, March 4, 2010
Frame work for Fridge and Electrical system


When the cabinet under the sink is cut out the water pump and city water hookup will be easier to get at.
The platform for the fridge will end up being 3/4 plywood mainly because I have a sheet of it and I might as well use it, and the strength of it. The frige is quite heavy and when it is full of food it will be a heavy item bouncing around back there. I am trying to come up with a good way to secure the fridge to the wall but am drawing a blank. Thanks for any ideas.
Door Window install


I worked on cutting in the sliding window in the door. The window is a medium tinted slider with a screen.
As I said before this is nessary for us to have a clear look outside before exiting the Hauler, remember the whole Grizzly bear post, hear you go.
I layed the hole out on tape to keep from scratching the door. When I was happy with the overall layout I cut the hole with a fine toothed jigsaw blade, this made for a nice clean cut. I had a small bit of cleaning up to get the window frame in the hole tightly. Overall this worked out better than I had thought it would.
The window has been sealed with silicone caulking and looks good.
Saturday, February 27, 2010
30 amp Electrical connection
Today the weather still was not cooperating for outside tasks. With that said I decided to cut in the shore power inlet and the water panel. A 30 amp weather proof plug was purchased from a Marine outlet. Along with a 50 foot cord prewired with weatherproof ends. To insure that the hole needed for the power inlet was in the correct place, I marked it from the inside on the wall of the trailer. The water panel was marked the same way. The water panel is lockable so noone can tamper with our water supply, and it had provisions for a city water hookup and a fill nozzle for the tank side. The onboard water tank will follow but is only 20 gallons, which should be enough for 2 showers and some dishes.


 The electrical plug is going to be hardwired with 10 gauge wire to a 45amp charger/converter, which I will outline when I get to that point.


Thursday, February 25, 2010
Bear Lighting System
My wife really wants to see a Grizzly Bear while we are in YellowStone. And I want to be able to see if a bear is waiting outside the door BEFORE I open it. So 4 High Intensity Halogen lights were installed today. Wiring has been run inside so the lights can be activated by a switch.


 Provisions have been made for a 12 volt Motion Sensor light to be installed later on in the build.
Also there is a window that will be put in the door as soon as the weather clears. It measures 18 X 22 inches and has a full screen


Also there is a window that will be put in the door as soon as the weather clears. It measures 18 X 22 inches and has a full screen
I have decided to use Dow 1 inch foam board to insulate the trailer. The walls are all sealed with the foam board and then any gaps are finished off with "Great Stuff" expanding foam. This keeps the foam board in place and ads approximatly a R=5.5 insulation factor. Which does not seam like much, but I believe it will keep the 15000 BTU air conditioner from working over time. And it will cut down on the outside noise transfer.


The ceiling will have a different setup.
I will be using the 1 inch Foam board PLUS a thermal radiant barrier that will make the overall insulation factor about R-22. The barrier material has been used by us in Radiant floor heating systems and it has proved its performance.
Subscribe to:
Posts (Atom)
